7-3 Setting up
7-3-1 Setting up the Hardware
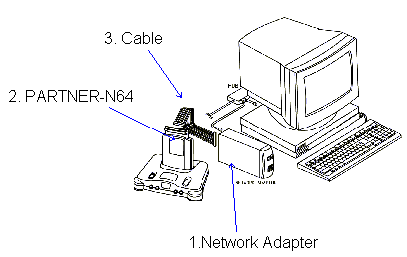
1. Setting the Network Adapter
Connect the specialized power supply and power cable to the network adapter. Next, set up the IP address to the network adapter by using the serial terminal. After verifying that the power of the network adapter and the serial terminal are OFF, connect them. Apply power to the network adapter and the serial terminal in that order.
After setting the IP address, turn power of the network adapter to OFF and connect it with Indy or the O2 workstation with the network cable.
2. Mounting PARTNER-N64
Insert PARTNER-N64 into the cassette mouth of the N64 alteration machine.
3. Connecting the Network adapter
Connect the 40-pin connector of the network adapter with the I/F connector (40-pin) of PARTNER-N64 using the specialized cable for the network adapter.
|
|
| Copyright 1997 Kyoto
Micro Computer Co., LTD. |
Figure 7-3-1 Setting up the hardware
4. Mounting the Controller, Video Cable and AC adapter
After verifying that the N64 power switch is OFF, connect the controller, the video cable (purchased separately) and the AC adapter. Connect the pin plug (RCA) side of the video cable to the television, and the AC plug side of the AC adapter to the outlet (AC Outlet).
7-3-2 Setting up the Software
In this manual, the compiler (cc), the assembler (as) and the linker (ld) required to develop the application should be already installed. For details, see Chapter 1, Section 2 [N64 Emulator software installation] from the Programming Manual. (However, you do not need to install gvd debugger.)
1. The installation of N64 OS
Install the include file, library, microcodes and sample program required to use the N64 OS on the N64 application. After inserting the DAT tape, go to the appropriate directory on the console and enter
% tar xv
(contents of DAT are expanded to the directory).
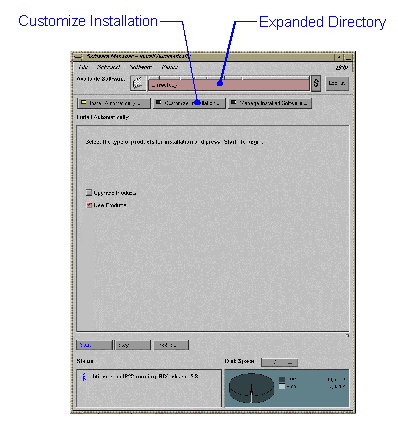
Next click "Software Manager" from the "System" menu with the left mouse button and activate "Software Manager". After activation, designate the directory the contents of DAT were expanded to and click "Customize Installation" with the left mouse button.
 |
Figure 7-3-2 Installation of the N64 OS
The installable contents, will be displayed so after selecting all (check the Install field), push "Start." When the installation ends without error, the Status field changes from "New" to "Same Version."
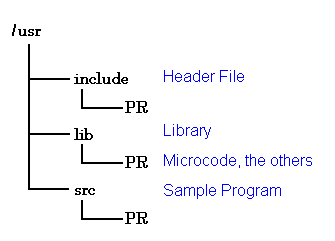
The directory configuration after the installation will appear as seen below:
1. The Installation of PARTNER-N64 (SGI)
Install debugger for debugging the created software.
Insert the PARTNER-N64 (SGI) Disk into the CD drive. On the CD, the "tar" format has been set up. Decompress the file within the appropriate directory. After decompressing, the shell script file "ptinst" for the installation is created. Execute "ptinst" from the console (the standard place for the installation is "/usr/local/partner-net/n64").
% ptinst
PARTNER-N64 (SGI) is compatible with "Software Manager" starting from version 1.06.


