
1-8 Texture
There is a limit to the shading method. For example, when you try to draw the Earth, you find that there are an infinite number of surfaces; including sea, continents, mountains, rivers, and so on. It is impossible to draw just by shading these surfaces because there are so many of them. There are not enough resources to be able to handle all of these surfaces in a real-time game. Therefore, you need to use texture. Texture is simply a two-dimensional image that you paste on a model. In the case of the Earth, you paste a picture of the Earth on a sphere model to create a model as illustrated here:
| |
Figure 1-8-1 Shading Only and Texture
The actual technique used to paste a two-dimensional image on a three-dimensional object is called texture mapping. The texture mapping process has three steps:
| Example N64 Functions (Texture) gSPTexture gDPLoadTexture(3P) gDPLoadTextureBlock(3P) gDPLoadTextureBlock_4b(3P) gDPLoadTextureTile(3P) |
1-8-1 Prepare 2D Image
First of all, you need to prepare the two-dimensional picture for texture mapping. The picture has various formats, but we will limit our discussion to the following main formats:
# Bitmap (RGBA) Format
The bitmap format is composed of four elements of RGBA per each texel.
A is for alpha value, which indicates the level of opacity (and therefore transparency). If all the texels are at full opacity (that is, none of them are translucent), the bitmap format may use just the RGB elements.
# Index Color Format
The index color format uses the TLUT (Texture Look-Up Table) and index texel data. This method loads several colors on a color pallet, and then specifies the pallet number of the texel using the index.
 |
Figure 1-8-2 Pallet and Index
This format generally requires less data than does the bitmap format.
This becomes apparent if you compare the amount of data required by a bitmap picture that expresses 1 texel by using 4 bytes to hold the RGBA value (R: 8-bits, G: 8-bits, B: 8-bits, A:8-bits), with the amount of data required by an index color picture that expresses 1 texel by using 1 byte to hold the index (256 indexes), plus another 4 bytes to hold the color pallet (R: 8bit, G: 8bit, B: 8-bit, A: 8-bit). Both pictures are the same size (32x32 texels).
The bitmap picture needs 4 bytes for every texel,
so it requires 32 x 32 x 4 bytes for a total of 4096 bytes.
The index color picture's index needs 1 byte for every texel,
thus it needs 32 x 32 x 1 bytes for a total of 1024 bytes for the index data.
In addition,the space needed to hold the index pallet, which is 256 X 4 bytes for a total of 1024 bytes, is required to hold the pallet data. (Add the two together and the index color picture requires only 1024 + 1024 bytes for a total of 2048 bytes.
As you can see, the index color format can represent the same picture using fewer bytes.
 |
Figure 1-8-3 Comparison of the data size
However, you need to be careful because the color pallet in the index color format is limited. Because the maximum pallet number is 256, the number of colors is limited to 256. Therefore, if you have a large complex picture that requires more than 256 colors, you need to use the bitmap format if quality is important.
| Example N64 Functions (Loading the TLUT) gDPLoadTLUT_pal16 gDPLoadTLUT_pal256 |
# Intensity Format
N64 has a format called "intensity" to express brightness. It is sometimes used as IA (Intensity Alpha) by combining intensity and alpha. Intensity holds information about brightness only; it has no color information. It can specify a color by using the color combiner, but this is like setting the color to the texture of the gray scale. As a result, it appears to be the gray scale of red or blue. In practical application, it is used to show smoke or a flame by combining alpha values. The biggest distinctive feature of the Intensity format is its compact data size. It needs the minimum three elements of RGB to have colors, but the intensity contains only information for brightness. Thus, even if you compared RGBA with IA, the number of elements is only half.
1-8-2 Choose Texturing Method
You have the option of simply drawing each texel's color information on the model, or adding special effects to the picture information. The direct drawing method is called the "decal mode" or the "sticker mode."
The addition of lighting and shading effects to texel colors is called the "modulation mode." Mixing texel colors with other arbitrary colors is called the "blend mixing mode."
The decal mode is not complicated, but it does not show the impact of lighting effects. Therefore, if you use it in excess you may ruin the stereoscopic effect of your scene.
 |
Figure 1-8-4 Choose Texturing Method
| Example N64 Functions gDPSetCombineMode (Setting for color information) gDPSetRenderMode (Setting for rendering information) |
1-8-3 Texture Coordinates
As a final step, you need to set the texture coordinates (S,T values) of the mapping data to each vertex and execute the texture mapping.
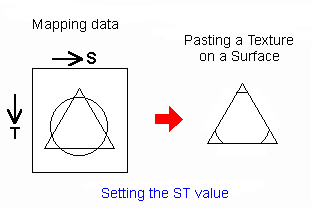 |
Figure 1-8-5 Pasting a Texture
Then you can map the texture on the surface.
| Example N64 Functions gSPVertex (set the vertex information) gSPModifyVertex (modify the vertex information) |
1-8-4 Mixing Process (Translucence)
In N64, it is possible to display translucence. We call the effect of seeing through to the rear of a scene, as if through jelly or cellophane, the mixing (blending or translucence)process.
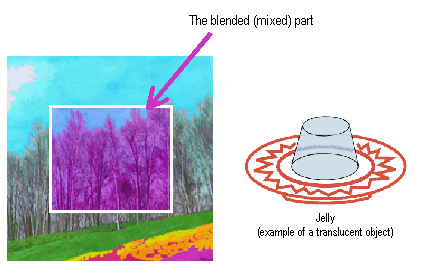 |
Figure 1-8-6 Example of the mixing process
There are many methods you can use to implement the mixing process. The following are two such examples:
# Blending by Using the Alpha Value
By using this method when you create the mapping data, you can prepare the RGBA data to specify the alpha value for each texel. The alpha value shows the level of translucence(more transparent or more opaque). For example, if the alpha value is 3.0, that means blend 30% for the already drawn pixel data when you draw the mapping data. The advantage of this method is that you can implement right down to the sprite (used in previous games) because it sets the alpha value for each pixel.
# Blending by Using the Mixed Coefficient
This method multiplies the mixed coefficient when you draw a surface. It blends without applying the alpha value in the mapping data, so it sets the level of transparency for the entire object. It therefore cannot be used to specify the transparency in units of texel.
When you provide the blend, you need to be careful of the drawing order of the translucent surfaces. In short, you need to follow the drawing order below.
Basically, the translucent surfaces are implemented by applying the translucent process to the picture that has already been drawn. Therefore, if you draw a translucent surface before drawing an opaque surface, the effect looks unnatural because there are no objects already drawn to be blended. Also, if you start to draw the translucent surfaces from the front, the effect looks unnatural because the rear translucent surfaces are drawn on top of the translucent surfaces in front.