5-3 Setting up
5-3-1 Setting up the Hardware
1. Mounting the N64 Emulator Board
After verifying that the power of the Indy workstation is OFF, remove the upper cover and connect the GIO connector.
Figure 5-3-1 Removing the Indy cover and mounting the emulator board
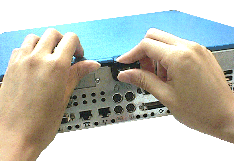
2. Mounting the N64 Controller Conversion Adapter
Insert the N64 Controller conversion adapter into the game controller port of the N64 emulator board. Insert the connector of the game controller port from left to right (viewed from the back of the Indy workstation) so that the cables do not crisscross. (The following figure is the way it should look, with the right-most modular connector vacant as viewed from the back.)
Figure 5-3-2 Connect the connector of the conversion adapter to the controller port
3. Mounting the N64 Controller and the Video Cable
Connect the N64 controller to the N64 controller conversion adapter and the video cable (purchased separately) to the AV output port of the N64 emulator board. Connect the pin plug (RCA) side of the video cable to the television.
Figure 5-3-3 Connect the adapter, the controller and the cable
4. Alter the N64 Emulator Board required for use with PAL
The following alteration is required when you use the N64 emulator board to create an application for Europe (corresponding to PAL).
Figure 5-3-4 Alteration of the N64 Emulator Board required for use with PAL
-Alter the N64 Emulator Board
- Part number X6 : Change the crystal oscillator (14.3MHz -> 17.7MHz)
- Part number R8 : Remove the resistance (4.7k ohm)
- Part number R6 : Add resistance (0 ohm)
-Alter the Flash ROM Cartridge
- Change CIC (for NTSC -> for PAL)
5-3-2 Setting up the Software
This manual assumes that the compiler (cc), assembler 9as), and linker 9ld) required to develop the application, and the debugger, (gvd), required to debug the created application, have already been installed. See Section 2 of Chapter 1, "Install the N64 Emulator Software" in the programming manual for details.
1. The installation of N64 OS
Install the included files library, microcodes and sample program required to use the N64 OS in the N64 application. After inserting the DAT tape, move to the appropriate directory on the console and enter
% tar xv
(contents of DAT are expanded to the directory). Next, click "Software Manager" from the menu, "System," with the left mouse button and activate "Software Manager." After activation, designate the directory the contents of DAT were expanded to and click, "Customize Installation", with the left mouse button.
 |
Figure 5-3-5 Installation of the N64 OS
The installable contents are displayed, so after selecting all (check the Install field), push "Start." When the installation ends without error, the Status field changes from "New" to "Same Version."
The directory configuration after the installation becomes as follows (this manual assumes these directories):
-If the disk capacity becomes insufficient during the installation, create disk space by adding hard disks or deleting unnecessary applications.